Viewport™
![]()


Computer Video Adapter for USB User Guide

System Requirements
- Requires Windows 2000 or XP.
- Runs best on USB 2.0 but will operate on all USB versions. (Windows 2000 requires USB 2.0)
Note: With USB 1.1 the Viewport is best used for display of reference material and still images.
Please disconnect the Viewport before installing the software.
- Run setup.exe from the installation disk or download it here: VPinstall.zip (1.6 MB)
- Install Viewport software from the CD or download the latest version here:
- Every time Windows installer asks about logo certification, select the “Continue Anyway” button.
- After restarting Windows, plug the Viewport in and follow the New Hardware Wizard to complete the installation.
- Right-click on the Windows Desktop and select the Properties option.
- Click on the Settings tab and drag the monitor into the proper position to extend the desktop, or Uncheck the Extend my Windows Desktop option to use the Viewport as a duplicate of your primary monitor.
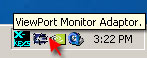
Settings are also accessible from the VP icon in the Windows taskbar.
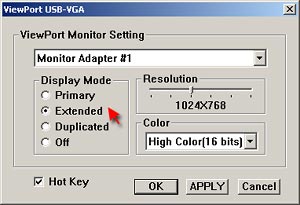
The Viewport Utility displays an icon in your Windows Taskbar when the Viewport is plugged in. This provides a quick and easy way to adjust the resolution, color, and display settings for the monitor. These settings may also be adjusted by right-clicking on the Windows desktop and selecting the “Properties” option, and the “Settings” tab .
- Display Mode
- Primary - Sets the Viewport monitor as your primary monitor (not recommended)
- Extended - Expands your Windows Desktop onto the Viewport monitor
- Duplicated - Makes the Viewport monitor a copy of your primary monitor
- Off - Turns off the Viewport
| Pixels | Colors |
|---|---|
| 640 x 480 | 16 or 32 bit |
| 800 x 600 | 16 or 32 bit |
| 1024 x 768 | 16 or 32 bit |
| 1152 x 864 | 16 or 32 bit |
| 1280 x 768 | 16 or 32 bit |
| 1280 x 1024 | 256 color or 16 bit |
You will optimize performance by choosing the lowest resolution and least number of colors your application requires. This will reduce the amount of data transferred on every screen refresh and will be particularly noticeable on USB 1.1 systems where speed is the limiting factor.
With USB 1.1 and the higher resolution and color settings, the Viewport is best used for displaying reference material or still images.
Monitor Position
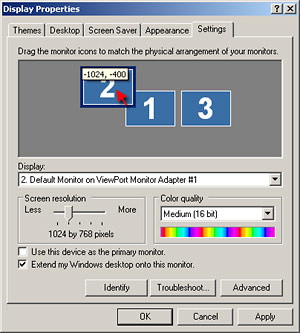
Windows supports up to nine monitors in the extended desktop. To position your Viewport monitor, right-click on the Windows Desktop, select the Properties option, and the Settings tab. Drag the monitor icon into position and click on the Apply button.
Note that the Screen resolution, Color quality, and Extended desktop settings available in the Viewport Monitor application are also available here. Unchecking the “Extend my Windows desktop. . .” box will turn the Viewport monitor into a duplicate of the primary monitor.
Mounting
The Viewport has slots on the bottom for mounting on two #6 screws 3.25 inches (83mm) on center. Other means, such as velcro or double-sided tape, may also be used for mounting the Viewport, but the user should take care not to obstruct the vents on the sides of the case.
Troubleshooting & Technical Support
Before contacting our Technical Support Staff, please verify the following.
- Viewport Software has been installed
- Monitor has power and is turned on
- Viewport is connected to active USB port
- Viewport has been tested on an alternative USB port
- Monitor has been tested on alternative VGA port
Many installation issues can be resolved by plugging the Viewport into a different USB port and following Windows New Hardware Wizard. If these steps do not resolve the issue, please contact our Technical Support Department.
E-mail: [email protected]
Phone: (517) 655-5523
Accessories | Developer´s Corner | Resources | Support
Shopping Cart | Checkout | Privacy Policy | Site Map
X-keys, Y-mouse, RailDriver and The No Slogan Company are Trademarks of P.I. Engineering, Inc.
Copyright © 2006 P.I. Engineering, Inc. All Rights Reserved.
101 Innovation Parkway
Williamston, MI U.S.A. 48895
1-517-655-5523
FAX: 1-517-655-4926
www.piengineering.com | www.xkeys.com | www.ymouse.com | www.raildriver.com
Visit Our New Divisions:
![]()
![]()